Sunday, December 9, 2018

Learning to Teach Econonimcs

5 Trends of Economic Education 
1) Economics and Citizen Education
2) Economic Education in Russia and Eastern Europe
3) Consideration of the importance of the global economy
4) Content Standards
5) Use of Computer Technology in economic education


Image result for teaching economics in elementary school

Approaches to Teach Economics
- Activities enhance citizenship understanding and skills
- Activities provide opportunities for manipulating data and using concrete examples
- Activities are formally planned but informal opportunities are used to analyze and review concepts as they arise in the news and classroom
- Activities link children's own experiences
- Activities link to the school district's curriculum

5 Principles of Teaching Economics
1) Meaningful- Students can bring items to class, and identify them as either a want or need
2) Integrative- When talking about where an item was produced, teachers can incorporate geography by having students research the country
3) Value-based- Teaching the benefits of good economy
4) Challenging- Role play as producers, sellers, and consumers by making the classroom a store and having students make, sell, and buy items using change
5) Active- Students learn the concepts and importance of money by using pennies, nickels, dimes, quarters, and dollars

Image result for making it rain with money

Fundamental Concepts of Teaching Economics 
- Scarcity
- Opportunity Costs and Trade offs
- Productivity
- Economic Systems
- Economic institutions and incentives
- Exchange, money, and interdependence


10 Tips to Engage Students in the Classroom


1) Make Connections to Real Life

When it applies to students lives they will be more connected to the lesson. If they don't feel connected they will lose interest.


2) Incorporate Students' Interest

Let students choose topics they are interested in. They will be more engaged. It is important for the teacher to be creative when incorporating the students' interests.


3) Present in Multiple Formats

There are multiple learning styles. Students all learn in different types of ways, so it is important to present the lesson in different ways to reach every student.


4) Offer Choices

Students will feel more involved if they have a choice in what they do or learn about. This will make them feel like they have a voice. It also will allow them to take ownership in what they are learning.


5) Breakouts

Students can stay engaged by being broken into small groups. Students are more engaged when they work in groups and to engage in discussions. It forces them to come out of their comfort zone.


6) Student Lead Activities 

This excites the students and ensures the have a chance to learn from each other. Students learn more from their peers than from the teacher.


7) Whole Class Participation 

This creates a cohesive learning environment in the classroom. All students will feel involved especially when held accountable.


8) Get Students Moving

Students can get restless sitting in desks all day. Activity increases involvement and creates a more meaningful learning experience.


9) Chunk it Out

Attention spans only last so long for everyone. Students will be able to listen, comprehend, and retain what you are teaching in a more meaningful way.


10) Be enthusiastic

Excitement is contagious. A teacher must bring positive energy to the classroom. This will make the students match their energy levels.


These 10 ways to keep students engaged was very helpful. I can not wait to try all of these methods out in my classroom when I become a teacher!

Saturday, December 8, 2018

Cooperative Learning Video Reaction


In order to fully understand the cooperative model seeing classroom examples is a big help. The video above shows two classrooms in a cooperative learning lesson. The lesson being taught are about analogies and Greek history. The most important things I observed in these videos are the the teachers strategies while using the cooperative learning model.


The video goes into the importance of assigning groups strategically. When dividing students into groups it is important to consider their developmental, intellectual, and cultural differences. A well mixed group will allow students to share talents as well as an opportunity to explore differences.


There are 5 phases of the cooperative learning model. Both teachers in the video do an excellent of demonstrating each phase.


5 Phases

1) Clarifying Aims

It is important to state goals for the students. In this phase the teacher is expected to tell the students everything that is expected of them.


2) Providing Learning Materials

The teacher must supply the students with the necessary resources so they can do what is being asked of them.


3) Organizing Study Teams

It is essential that each teams works in an environment where they feel comfortable doing work. The study teams should be spread so they have enough space to talk to each other and work together.


4) Assisting Teams

In this phase the teacher goes group to group to assist the students. It is very important that the teacher does not help too much to the point where the students don't have to think, and not too little where the students have no idea what they are doing. The teacher needs to find a perfect medium when assisting teams.


5) Sharing, Evaluating, and Recognizing Work 

The teacher went around questioning groups on how well they thought they worked to together. The teacher pointed out the importance of not doing all the work and letting your group members help while at the same time not doing your part. Everyone should be contributing close to the same amount.


This video was very helpful in learning what it takes to run a successful cooperative learning lesson. The 5 phases provides guidelines on how to conduct the lesson, and make sure the students get the most out of the experience.


Image result for 1996 bulls championship
                                
                                                          Teamwork makes the dream work


SIX THINKING HATS


The Six Thinking Hats is a method to teach cooperative learning. It was created by Edward deBono. The purpose of the six thinking hats is to have students look at what they are learning from different perspectives. Each hat has a color to represent it, and that color is associated with the words that make up the hat


Image result for fireThe first thinking hat is the red hat. This hat is associated with fire and warmth. It is associated with emotions, hunches, intuition, and gut feeling.


The second thinking hat is the yellow hat. This one is associated with sunshine. The perspective used in this hat is optimism, and logical and positive thinking.


Image result for raisin bran sun


The third thinking hat is the black hat. This is associated with a stern judge. The perspective you are looking at in this hat is as a critic, and analyst. You are looking at it in a logical and negative way.


Image result for judge judy


The fourth thinking hat is the green hat. This hat is associated with vegetation and rich growth. This perspective is supposed to be in a creative way, with possibilities and ideas.


Image result for plants


The fifth thinking hat is the white hat. This hat is associated with white paper. This covers facts. The perspective used in this hat is neutral objective, and informational.


Image result for loose leaf paper


The sixth and final hat is the blue hat. This hat is associated with sky and overview. The things that go into this are agenda, process, organizer, and making decisions.


Image result for blue sky


Image result for 6 thinking hats


Cooperative Learning

Since my last blog post discussed a cooperative learning lesson my group and I conducted I think it's important to go over what cooperative learning is and why we do

Cooperative learning is a teaching strategy involving student participation in small group learning. These group learning activities promote positive interaction. 

Cooperative learning promotes academic achievement, is relatively easy to implement, and is not expensive. Children's improved behavior and attendance, and increased liking of school, are some of the benefits of cooperative learning (Slavin, 1987).

Despite being used with mostly older students it can be used with all grade level students because it promotes student motivation, encourages group processes, fosters social and academic interaction among students, and rewards successful participation. Students are also fored to go more indepth on the material during cooperative learning. These are all important when trying to create active learners.

Research finds that cooperative learning activities improve children's relationships with peers, especially those of different social and ethnic groups. This can be an important step in bridging the divide between groups of students. Cooperative learning is also said to create a positive outlook towards school which will lead to further success even after the student leaves your classroom. As a teacher you always hope to leave a positive impact on the student that they will use for the rest of their lives. Cooperative learning helps this happen. 


Cooperative Lesson Plan

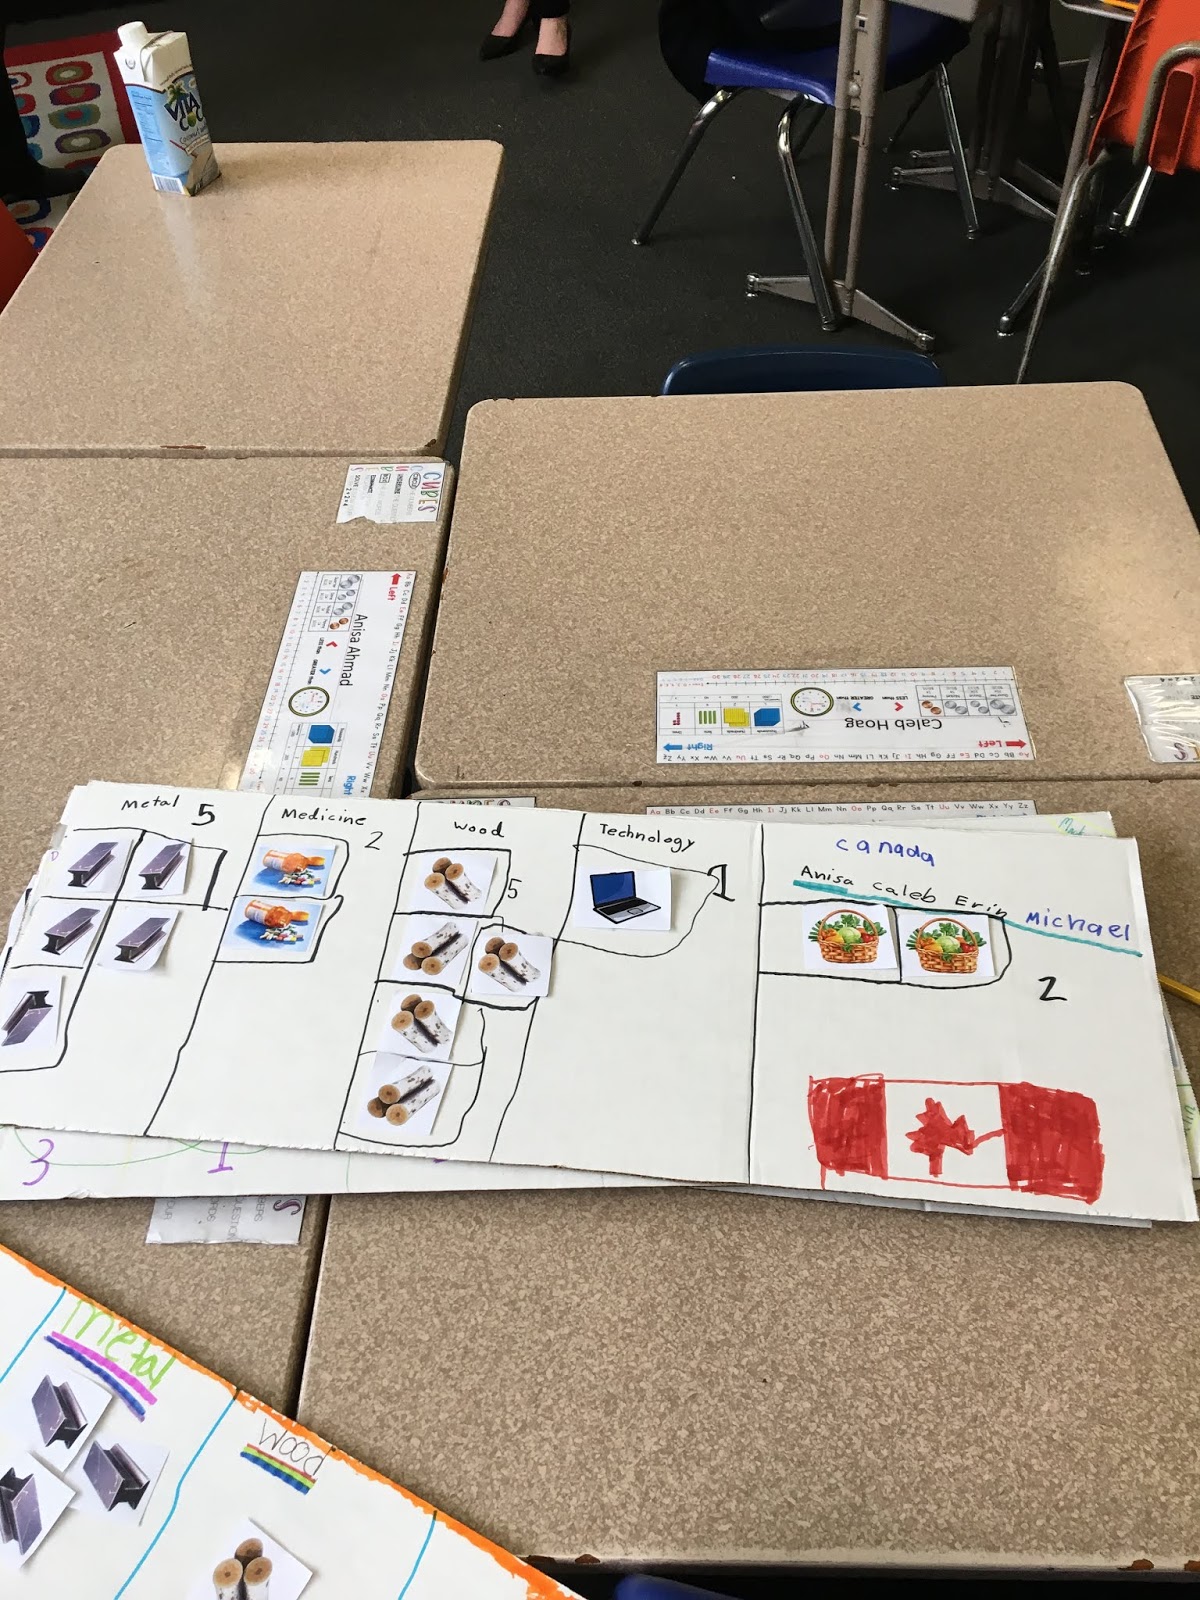
With the direct instruction and inquiry lesson plans in our rear view mirror it was time for the cooperative lesson plan. It was our last chance to separate ourselves and prove ourselves. I was excited yet nervous to see how this lesson went because there were a lot of moving parts. We divided the class into groups which represented countries. We wanted these countries to trade with each other so they had enough of each supply we gave them. The countries needed at least 5 pictures of one material and at least one of every other material. Each member of the group had a different job. The jobs were data collector, trader, fact checker, and organizer. In order for each country to be successful every member had to complete their role.

The groups first had to count and see how much of each material they had. The materials were wood, medicine, metal, food, and technology. Once they counted their materials the data collector walked around to every group, and wrote down what each group had. Using this information the students traded with each other until they received the necessary number of materials. After they had what they needed they needed to glue their materials on a poster they could design, and present their posters to the rest of their class. The groups also had to create a trade log. The trade log was split into columns. The columns were the name of their country, what number of goods they started with, what they exported, what they imported, and what goods they finished with. This related the vocabulary words back to them, and made them meaningful.

I was extremely happy as to how smoothly this lesson ran. Everything went according to plan, and the class was under control. Keeping the class under control was my biggest worry coming in due to the amount of things going on during the lesson. I was happy with the work my group and I did, and was excited to get to do this as a job one day. My group definitely saved our best lesson plan for last.


Group Posters


Here is the link to the PowerPoint
Here is the link to the formal lesson plan
Here is the link to the data collector sheet
Here is the link to the trade log

Inquiry Lesson Plan

After a less than ideal direct lesson plan, my group and I came together and worked strenuously to create what we felt was an exciting and thought provoking inquiry lesson plan for the ages. 

We started our lesson by reviewing the classroom rules. We then jumped into the problem the students would have to solve using the inquiry method. Our problem was the labels on the packages at Stewart Airport got switched around, and we needed the students to figure out what country each bag was from using a sheet that told them the main exports from each country. 

Before we jumped in to the inquiry method, we reviewed some of the key terms we taught during the Direct lesson plan. These key terms included import, export, goods, and services. Once we felt the students were comfortable we were ready to move on. 

We demonstrated how to solve the problem using an example we created from another country. The 4 groups were given a list of countries with their main exports listed. Each group was given a separate bags representing countries. These bags contained clues pertaining to what country it represented. The students had to create a hypothesis of what country they thought they had based on the first clue they pulled out of the bag. They then had to pull all the other clues out of the bag and talk with their group members about what country they thought they had. They had to write what they found, and form a conclusion of what country they had and why. After all the groups were finished they presented their report sheets to the class. I was happy to see that everyone's hypothesis was correct. For an independent practice to do at home, the students had to write a letter to the president of the airport explaining what country they thought they had and why. 

I felt our inquiry lesson plan went a lot better than the direct instruction lesson plan. Our classroom management skills definitely improved, while they still were not all the way where they needed to be. I felt the students enjoyed the lesson, and seemed to be engaged with the process.


Image result for Airplane    Image result for package

Here is the link to the PowerPoint presentation we used
Here is the link to the formal lesson plan
Here is the link to the demo example of the research sheet